
User Guide
Learn how to get the most out of todiia. This guide covers all features, tips, and tricks to boost your productivity.
Getting Started
Welcome to todiia! Here's how to get started with organizing your tasks and boosting your productivity.
Creating Your First Project
Projects in todiia are created through a guided process. Instead of manually building a task list, you describe what you want to accomplish and the app helps you break it down into actionable steps.
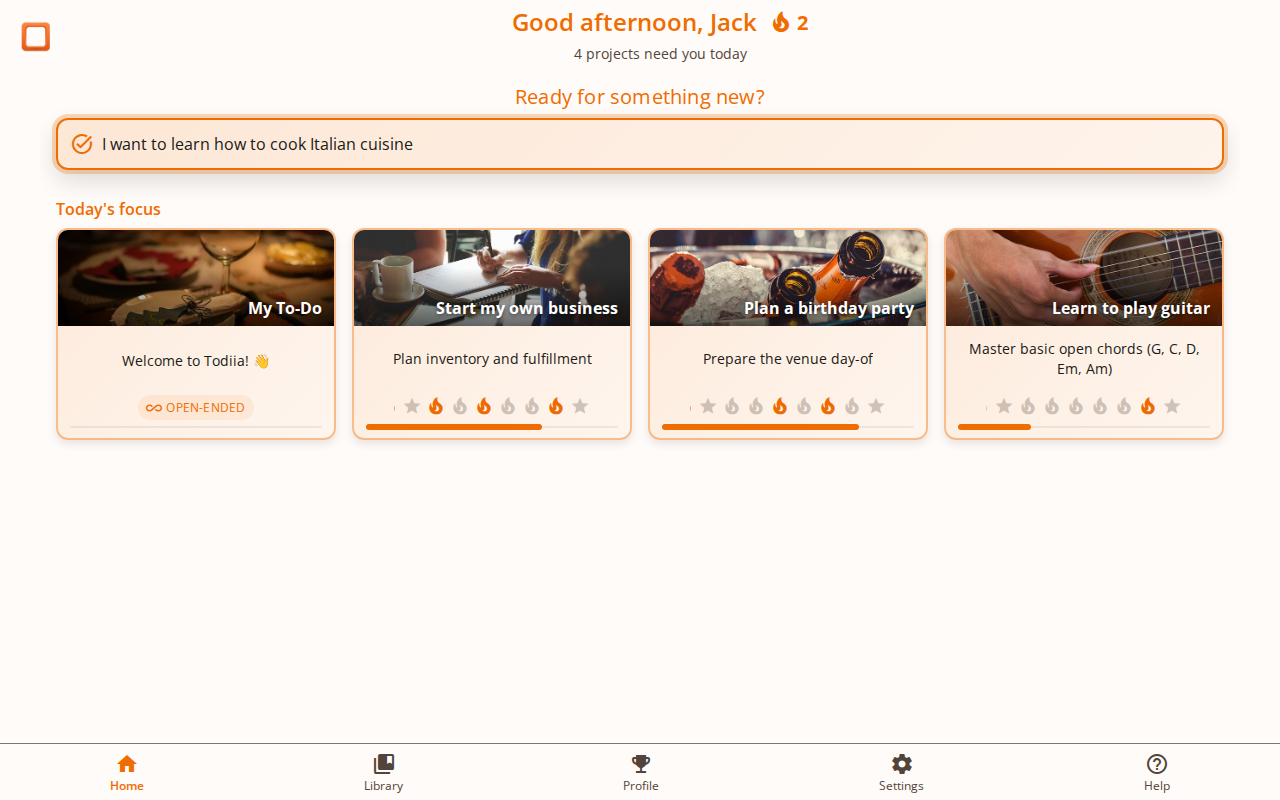
- Type what you want to accomplish in the search bar (e.g., "Renovate my bathroom", "Learn to play guitar", or "Organize a birthday party")
- Press Enter to start the clarification process
- Answer the questions to help refine your project
- Once clarification is complete, the app generates your project with steps
Your Default "My To-Do" Project
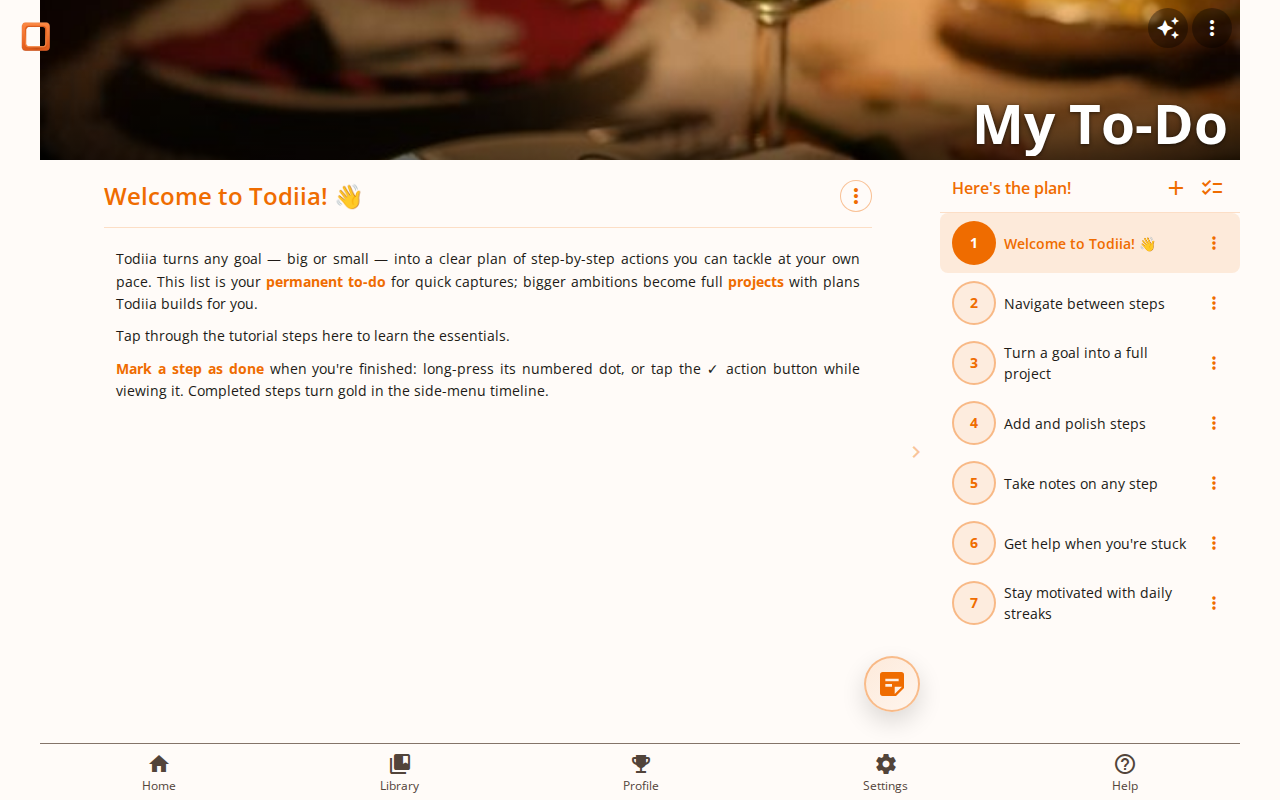
The first time you open todiia, a My To-Do project is automatically created for you. Think of it as your always-on todo list for quick tasks that don't need a full project of their own.
It comes pre-loaded with a short onboarding tour (7 steps) that walks you through the main features — navigating between steps, adding notes, asking the coach for help, and building a daily streak.
- Marked with an open-ended indicator (∞) — it never counts as “complete” and is excluded from streak tracking
- Protected from accidental deletion — you can unlock it from the project menu if you ever want to remove it
- You can add, edit, and delete steps freely, just like any other project
Understanding Projects
Each project consists of multiple steps that guide you through completing your goal:
- Steps - Individual actions to complete your project
- Progress dots - Visual indicators showing which steps are done, current, or pending
- Instructions - Detailed guidance for each step
- Notes - Your personal notes and reminders attached to steps
Pro Tip
Be descriptive when entering your project goal. The more context you provide, the better the app can understand what you need and generate relevant steps.
Clarification Process
When you start a new project, todiia uses a smart clarification process to understand exactly what you need. This ensures your project is tailored to your specific situation.
How It Works
- Enter your goal in the search bar and press Enter
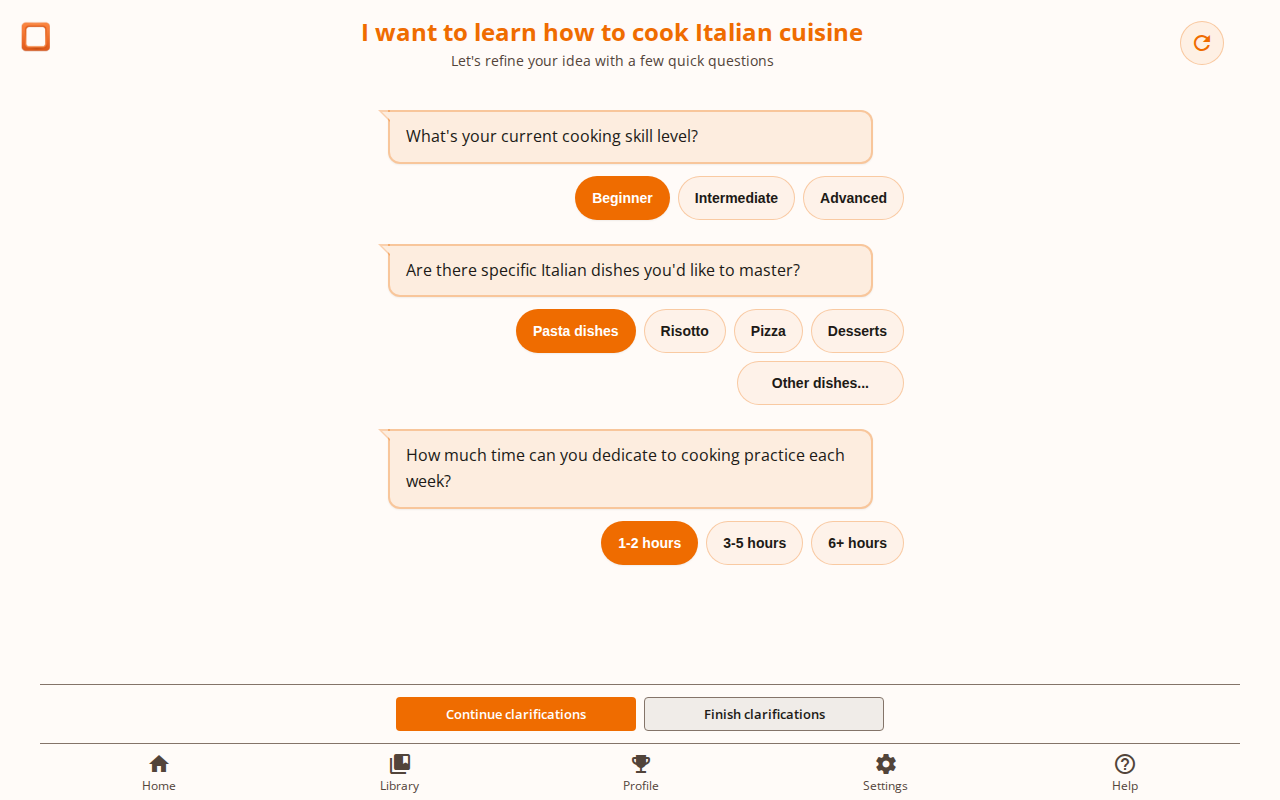
- The app analyzes your request and asks clarifying questions
- Answer each question - they can be yes/no, multiple choice, or free text
- Submit your answers to get more questions or finish clarification
- When ready, click "Finish clarifications" to generate your project
Question Types
Yes/No Questions
Simple binary choices. Click "Yes" or "No" to answer quickly.
Multiple Choice
Select one option from a list of predefined choices relevant to your project.
Free Text
Type your own detailed answer when more specific information is needed.
Starting Over
If you want to start fresh with new questions, use the "Restart" button. This will clear your current answers and begin a new clarification session with the same goal. A confirmation dialog will appear to prevent accidental restarts.
Example
For "Master making homemade pasta", the app might ask: "What equipment do you have?", "Any dietary restrictions?", and "How much time can you dedicate per practice session?"
Project Coach
After your project is created, the Project Coach helps you refine and improve your plan through an interactive conversation. Whether the generated steps don't quite fit your needs or you want to simplify your approach, the coach is there to help.
Opening the Coach
There are two ways to open the Project Coach:
- After project creation - A feedback prompt appears asking if you're happy with the result. Click the thumbs down button to open the coach and refine your project.
- From the project header - Click the coach button (chat icon) in the project header at any time to make adjustments.
Quick Actions
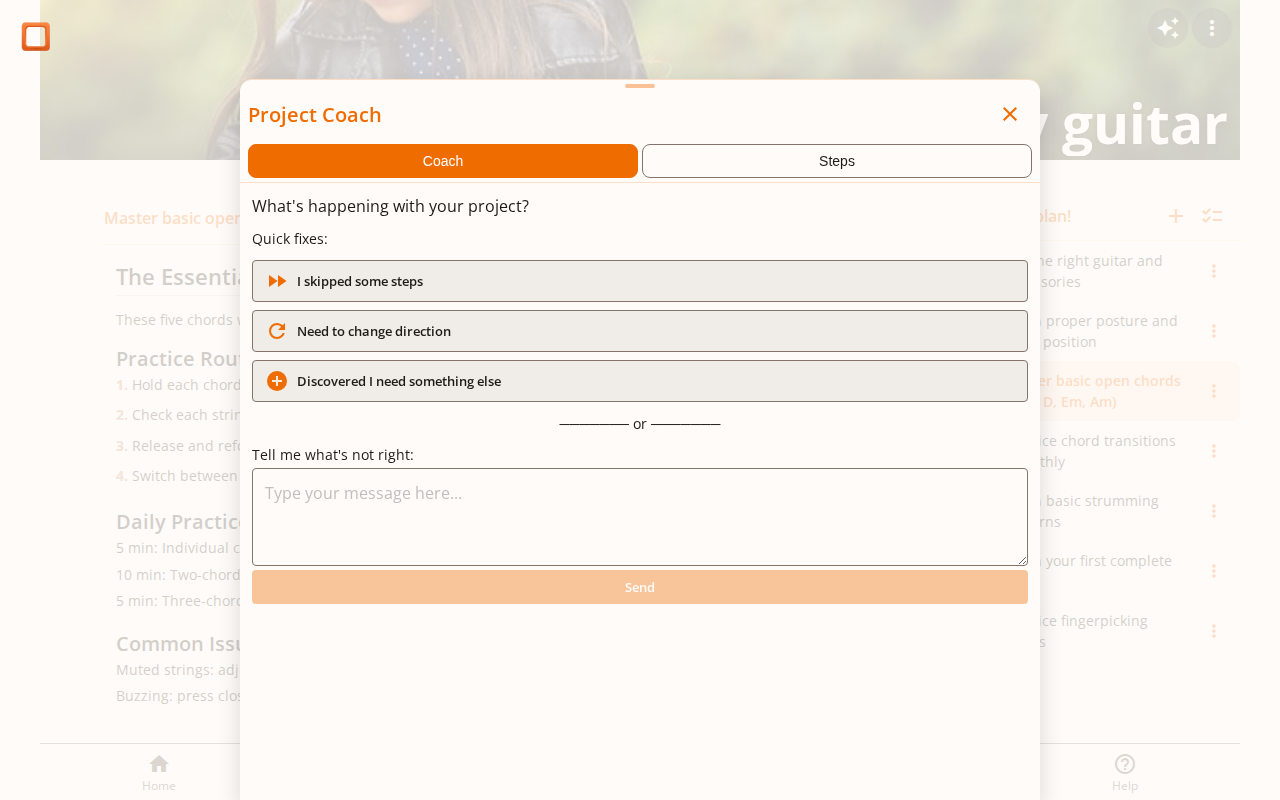
When you open the coach, you'll see quick action buttons. The choices depend on whether you've just created the project or are partway through it:
- Right after creation:
- Simplify (fewer, easier steps) — reduce the number of steps for a more manageable plan
- Add more detail — break down the plan further for more guidance
- Once you're working through the project:
- I skipped some steps — let the coach skip past steps that no longer apply
- Need to change direction — pivot the remaining plan based on what you've learned
- Discovered I need something else — weave in a new requirement that came up
Click any quick action to instantly start refining your project in that direction.
Having a Conversation
For more specific changes, type your own message in the chat input. Describe what you'd like to change:
- "I want fewer steps - this feels overwhelming"
- "Can you add a step about budgeting?"
- "Focus more on the practical aspects, less on theory"
- "I only have weekends available, adjust the plan accordingly"
The coach will respond with suggestions and may propose changes to your project.
Previewing & Editing Changes
When the coach proposes changes to your project, you can preview them before applying — and adjust the proposal directly in the preview if it's not quite right:
- Click Show preview to see the revised plan
- Each step shows a badge:
- Kept — carried over from your current plan
- New — added by the coach
- Done — already completed and untouched
- Tap a Kept or New badge to flip its status — you can drop a step you don't want, or rescue an existing one the coach removed
- Drag any row to reorder the proposed plan
- If a "New" step really matches an existing one, use the picker on the row to force-match them so you don't lose your notes and instructions
- Hit Reset to undo your preview edits and start over
- Click Back to return to the conversation, or Apply changes when you're satisfied
Once you apply, your project is updated with the new steps and the coach panel closes automatically. Notes and instructions on Kept (or force-matched) steps are preserved.
Tab Navigation
The coach panel has two tabs:
- Coach - The conversation interface for refining your project
- Steps - A quick view of your current project steps without leaving the panel
Switch between tabs to reference your current plan while discussing changes with the coach.
Pro Tip
Use the coach early in your project journey. It's easier to refine your plan before you've started working through the steps than to adjust it later.
Project Information
The project information panel lets you view and edit your project's metadata after creation. You can update the title, description, and review the original clarification notes.
The Project Menu
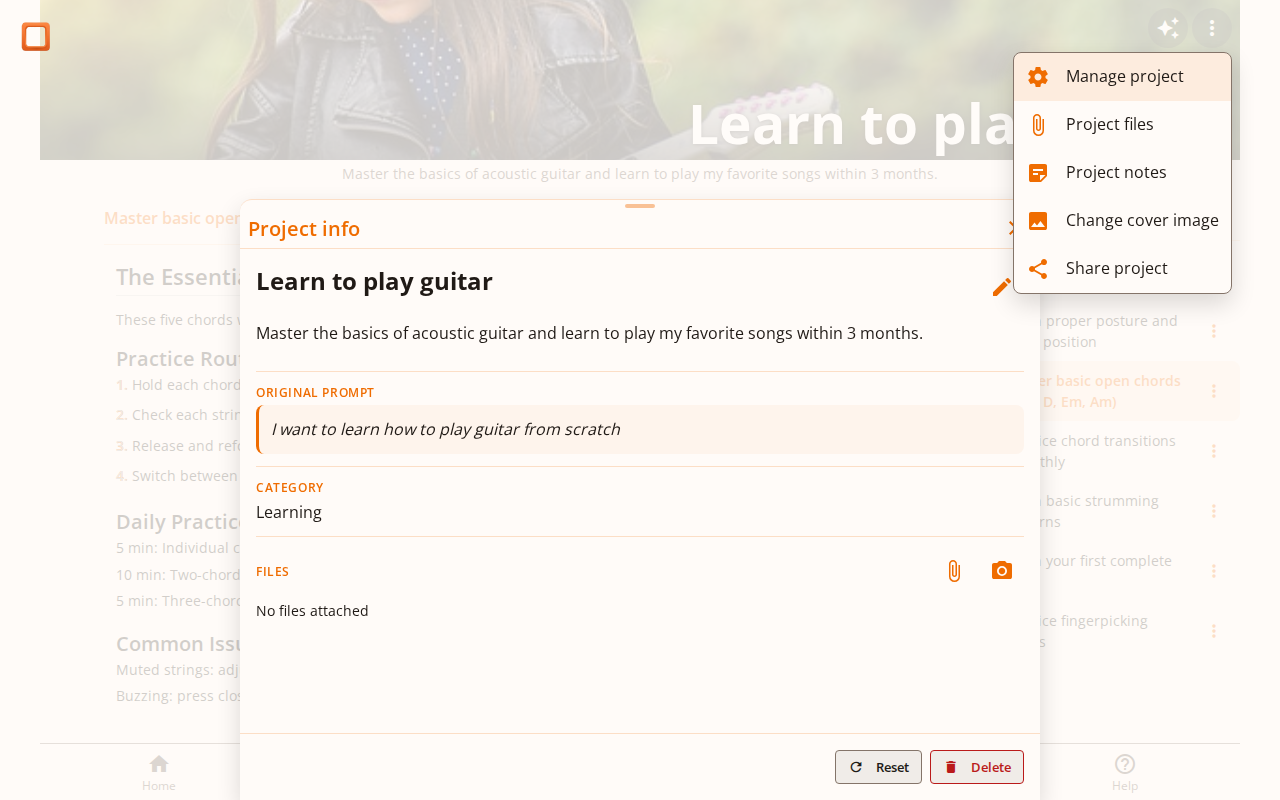
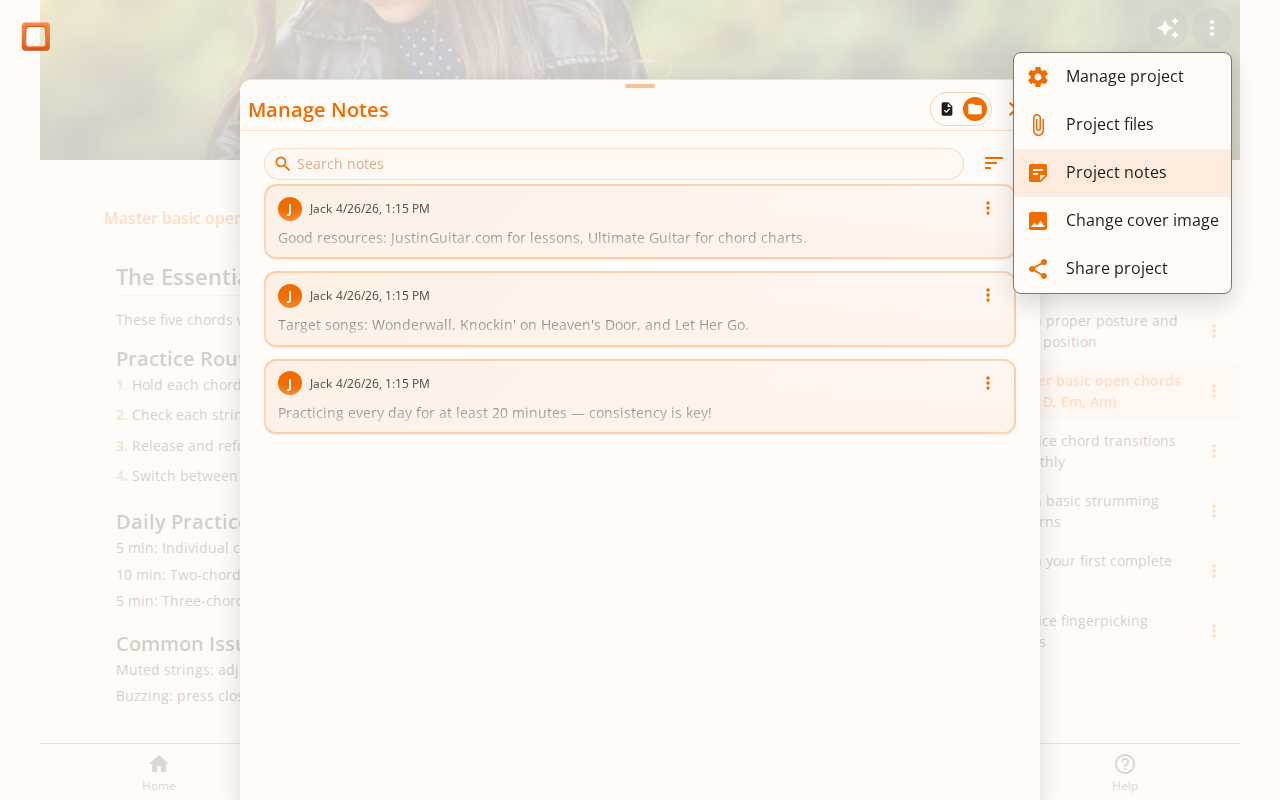
Everything project-level lives behind the three-dot menu in the project header (top-right). It groups five actions:
- Manage project — opens the information panel (title, description, original prompt, clarification notes)
- Project files — files attached at the project level
- Project notes — notes that apply to the whole project, not a single step
- Change cover image — pick a new header image (see below)
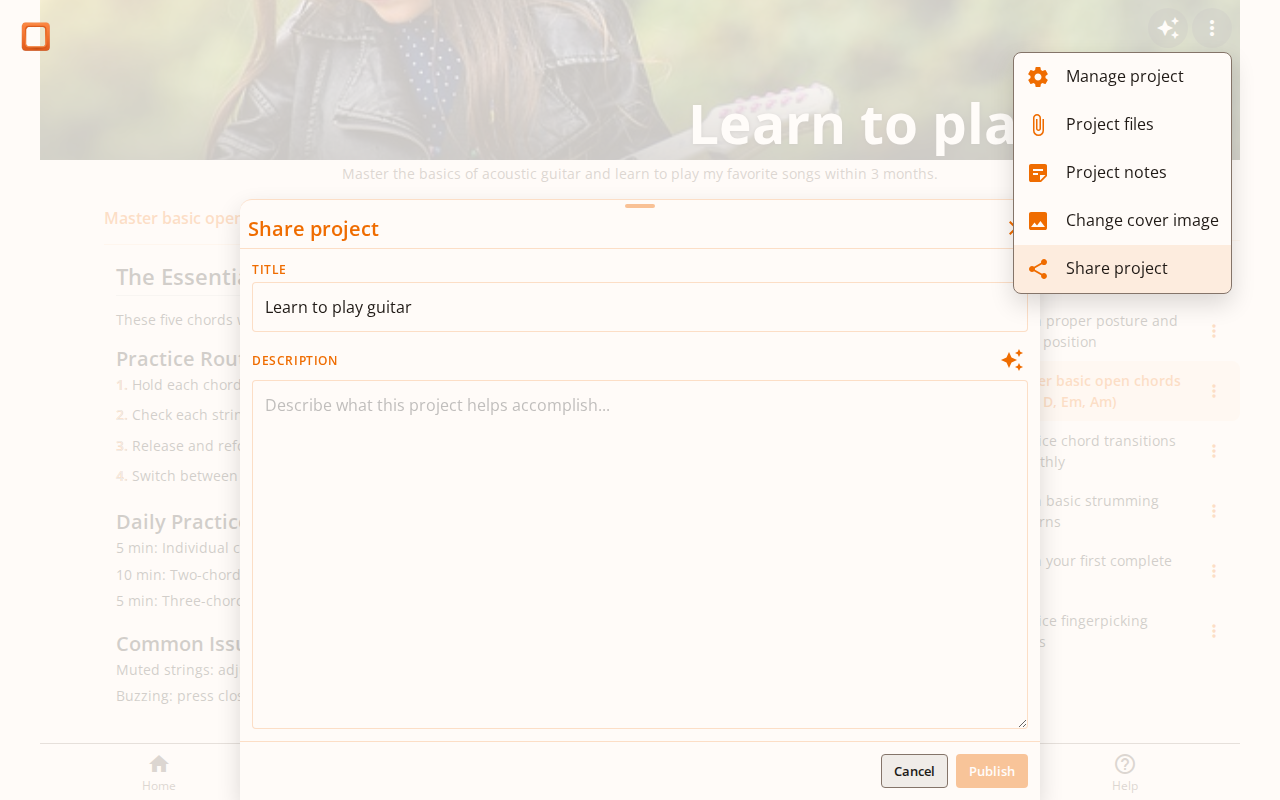
- Share project — publish as a template for others to clone
Editing Project Details
- Open the project menu and choose Manage project
- Click the Edit button in the panel header
- Modify the title and description fields
- Click Save to apply your changes
Your changes are immediately reflected across the app — the project header, dashboard cards, and any shared templates will show the updated information.
Changing the Cover Image
Every project gets an automatically picked cover image based on its title, but you can always change it to something more personal. Open the project menu and pick Change cover image. The picker has three tabs:
- Search — type a keyword to browse free Pixabay photos
- Upload — pick a JPG, PNG, or WebP file from your device
- Photo — take a photo with your camera right now (mobile)
Once you've picked an image, drag to frame the part you want as the header and confirm.
Pro Tip
Use the info panel to refine your project title after the initial creation. A clear, concise title helps you quickly identify projects on your dashboard.
Working with Steps
Once your project is generated, you'll work through it step by step. todiia provides intuitive ways to navigate, track progress, and manage your workflow.
Progress Indicator
The progress indicator shows dots representing each step in your project:
- Current step - Highlighted to show where you are now
- Completed steps - Marked as done when you finish them
- Pending steps - Future steps waiting to be tackled
Navigating Between Steps
You can move between steps in several ways:
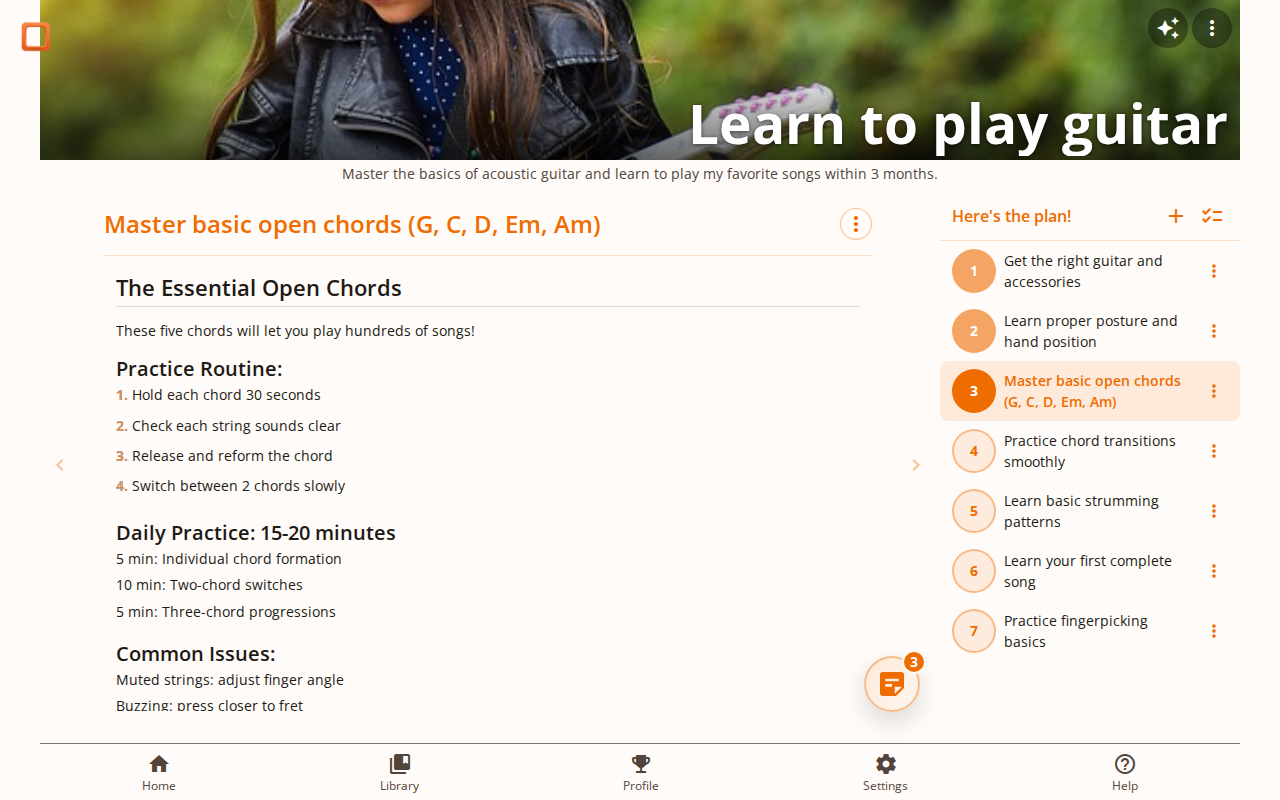
- Click a progress dot - Jump directly to any step
- Open the task list - See all steps and click to navigate
Splitting Steps
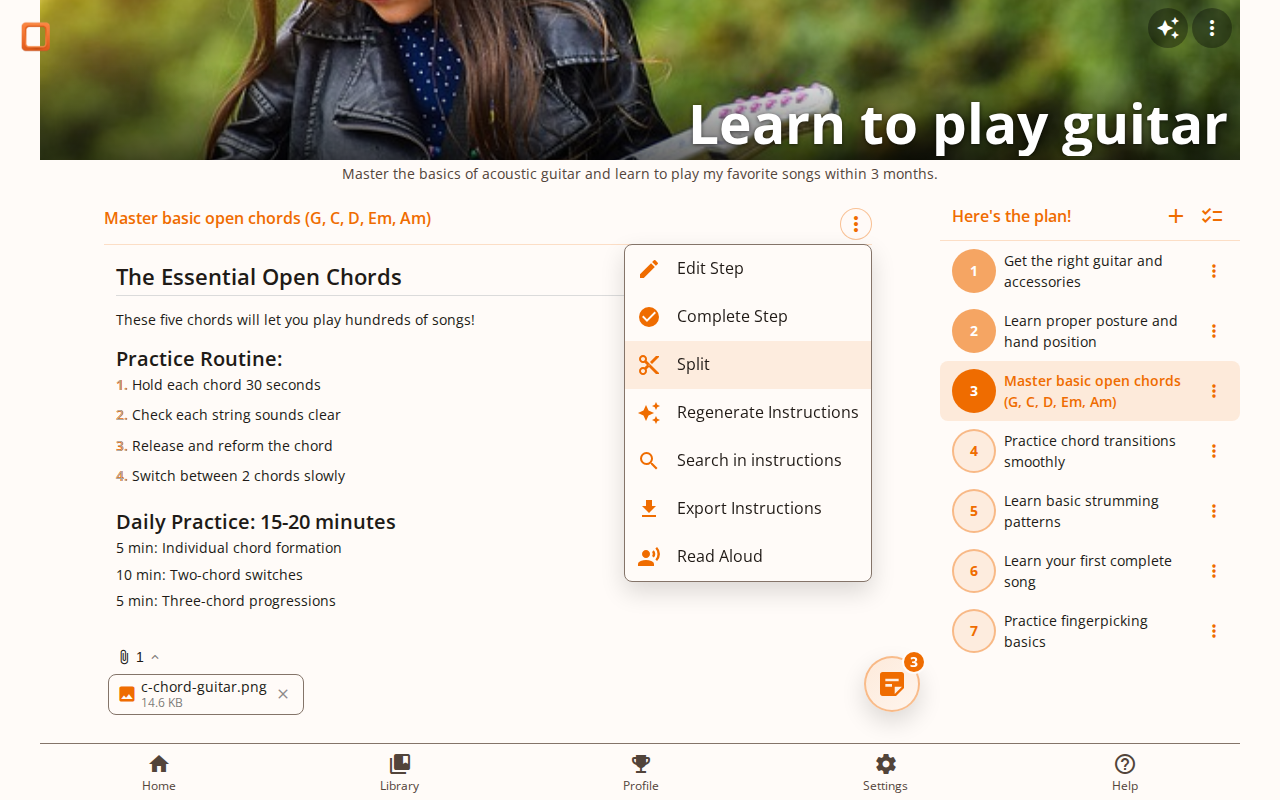
Sometimes a step is still too big or complex to tackle in one go. The split feature lets you break it down further:
- Open the task menu for the step you want to split
- Click Split to break it into smaller sub-steps
- The app analyzes the step and creates more granular actions
- The original step is replaced by its sub-steps
The number of sub-steps follows your max initial steps preference (Settings › General), so you can dial how granular splits should be.
This is the core of todiia's step-by-step philosophy: keep splitting until every action feels manageable enough to start right away.
Note: When you split a step, any notes you've attached to it are preserved and automatically moved to the first sub-step. Your thoughts and discoveries won't be lost.
Inserting New Steps
Sometimes you realize you need an additional step that wasn't in the original plan. You can insert new steps anywhere in your project:
- Open the task list (it's already shown beside the instructions on desktop; on mobile, drag up from the progress indicator)
- Click the three-dot menu next to any step row
- Select Insert before or Insert after
- Enter a description for your new step
- The step is added and you can generate instructions for it
Note: You can only insert steps adjacent to uncompleted steps. Once a step is marked as complete, you cannot insert new steps next to it. This keeps your completed work intact while allowing flexibility for what's ahead.
Duplicating a Step
For repeating tasks — daily practice, weekly habits, or anything you want to schedule multiple times — open the step's menu and choose Duplicate. A dialog lets you create copies in two ways:
- By count — pick how many copies you want, up to 366 (a full year)
- Until a given date — pick a target date and the app creates one copy per day until that date, with each copy's planned date pre-filled
Useful for things like "practice guitar 30 minutes per day until the recital" or "drink a glass of water every morning for the next 90 days".
Editing Steps
You can edit any step's description and instructions directly:
- Open the task menu for the step you want to edit
- Select "Edit" to open the fullscreen editor
- Modify the step description or instructions as needed
- Click "Save" to keep your changes
The editor also lets you generate or regenerate instructions with custom guidance, giving you full control over each step's content.
Completing Steps
Mark steps as complete using any of these methods:
- Task menu - Open the menu and click "Complete"
- Long press - Hold down on a progress dot for about half a second
- Task list dot - Click the dot next to a step in the task list
Automatic Reordering
When you complete a future step (not the current one), it automatically moves to join your completed steps. The current step stays where it is. This keeps all your completed work together at the beginning, with pending steps ahead. The philosophy is simple: what's done stays behind, what's left stays in front.
Example: You're planning a birthday party. While waiting for RSVPs on the invitations, you decide to order the cake early. When you mark "Order cake" complete, it moves to join your completed work, but "Send invitations" stays your current step.
Before
1. Book venue ✓
2. Send invitations ← current
3. Order cake
4. Buy decorations
After completing "Order cake"
1. Book venue ✓
2. Order cake ✓
3. Send invitations ← still current
4. Buy decorations
Completed steps can be unmarked the same way if you need to revisit them.
Pro Tip
The long press gesture is particularly useful on mobile devices for quickly marking steps complete without opening menus.
Reordering Steps
Steps can be reordered by drag-and-drop directly in the task list. Press and hold any step row, then drag it to its new position:
- On desktop, click anywhere on a row and drag immediately
- On mobile, hold the row for a brief moment, then drag — this avoids accidentally triggering a drag while scrolling
- Completed steps stay in place — the drop is blocked so the order of what you've already done isn't disturbed
Selecting Multiple Steps for Bulk Actions
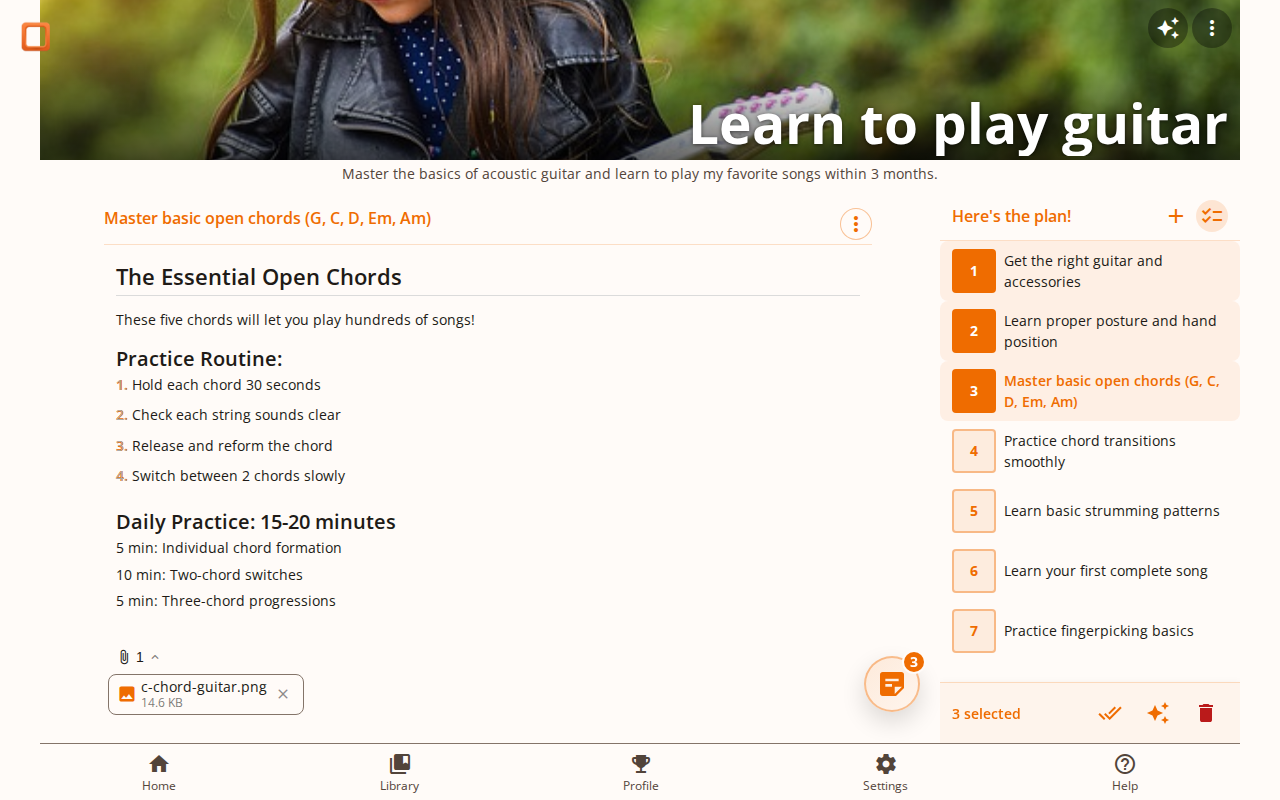
When you want to act on several steps at once — delete or regenerate instructions in batch — switch the task list into selection mode:
- Tap the checklist icon in the task list toolbar to enter selection mode
- Tap each step's dot to toggle its selection — selected steps show as a filled square with their step number, unselected as an outline
- Use the action bar at the bottom to:
- Select all — one tap to toggle every step on/off
- Regenerate instructions — rebuild the AI guidance for all selected steps in one go (a small spinner appears on each row as it's processed)
- Delete — remove the selected steps after confirmation
- Tap the toolbar icon again to exit selection mode
Changed your mind after deleting? An Undo bar appears right after the deletion. It stays for about 20 seconds, giving you time to restore the steps in one click if needed.
Step Instructions
Each step can have detailed instructions to guide you through the work. This is especially helpful for unfamiliar tasks or when you need a reminder of the specific approach.
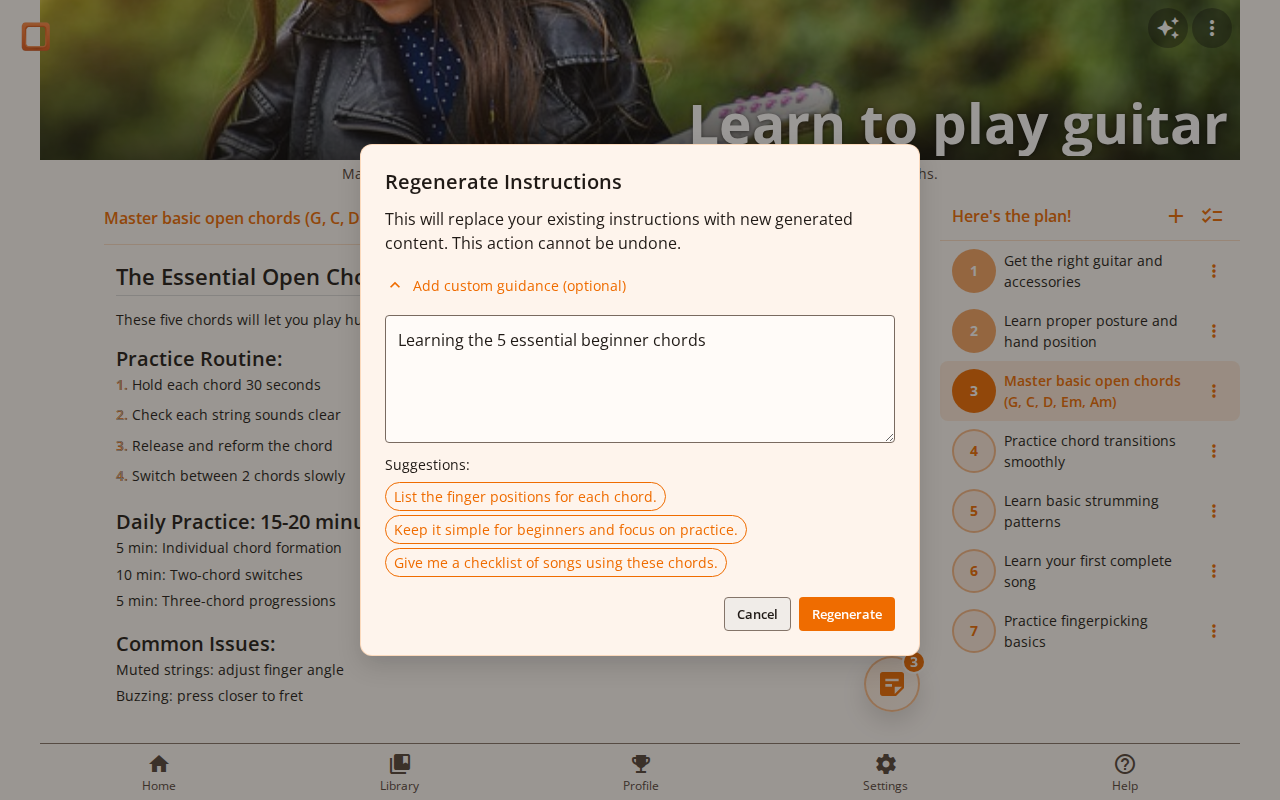
Generating Instructions
When the project is created, every AI-generated step starts with a short Markdown summary — just enough to capture the intent. You see it as the headline of the step's instruction panel. It's a good starting point and you can leave it as-is for straightforward steps.
When you want a richer, step-by-step guide:
- Click Generate detailed instructions below the summary
- A dialog opens where you can add optional guidance
- Click Generate to create detailed instructions that replace the summary
You can also generate detailed instructions for many steps in one go — see Selecting Multiple Steps for the bulk regenerate action.
Custom Guidance
Get more relevant instructions by providing your own guidance. When generating or regenerating instructions, you'll see a dialog with:
- Smart suggestions - Click any suggestion to use it as your guidance
- Custom text area - Write your own specific guidance to steer the generation
Your guidance is saved with the step, so future regenerations will use it as a starting point.
Example
For a step like "Gather documentation on learning Italian", add guidance like "Focus on vocabulary resources and spaced repetition apps" to get a curated list of specific learning tools instead of generic research steps.
Regenerating Instructions
If the generated instructions don't fit your needs, you can regenerate them:
- From the task menu - Click the menu icon and select "Regenerate"
- From edit mode - Open the step editor and click the magic wand button
The guidance dialog will open, allowing you to refine your guidance before regenerating. Your previous guidance will be pre-filled.
Clickable Links
Generated instructions often include helpful links to documentation, tutorials, or resources. All links in your instructions are clickable and will open in a new tab, so you won't lose your place while exploring references.
Searching Within Instructions
For long instructions, use the search button (magnifying glass icon) in the top-right corner of the instructions panel to find specific text quickly:
- Type to highlight matches live as you type
- Use the up/down arrows to jump between matches
- Press Enter for the next match, Shift+Enter for the previous one
- Press Escape or click the close button to exit search
Editing Instructions
You can customize instructions to better fit your needs:
- Open the task list and click the edit button on a step
- The fullscreen editor opens with the step description and instructions
- Edit the text as needed - you can modify, add to, or replace the generated content
- Click "Save" to keep your changes
Read Aloud
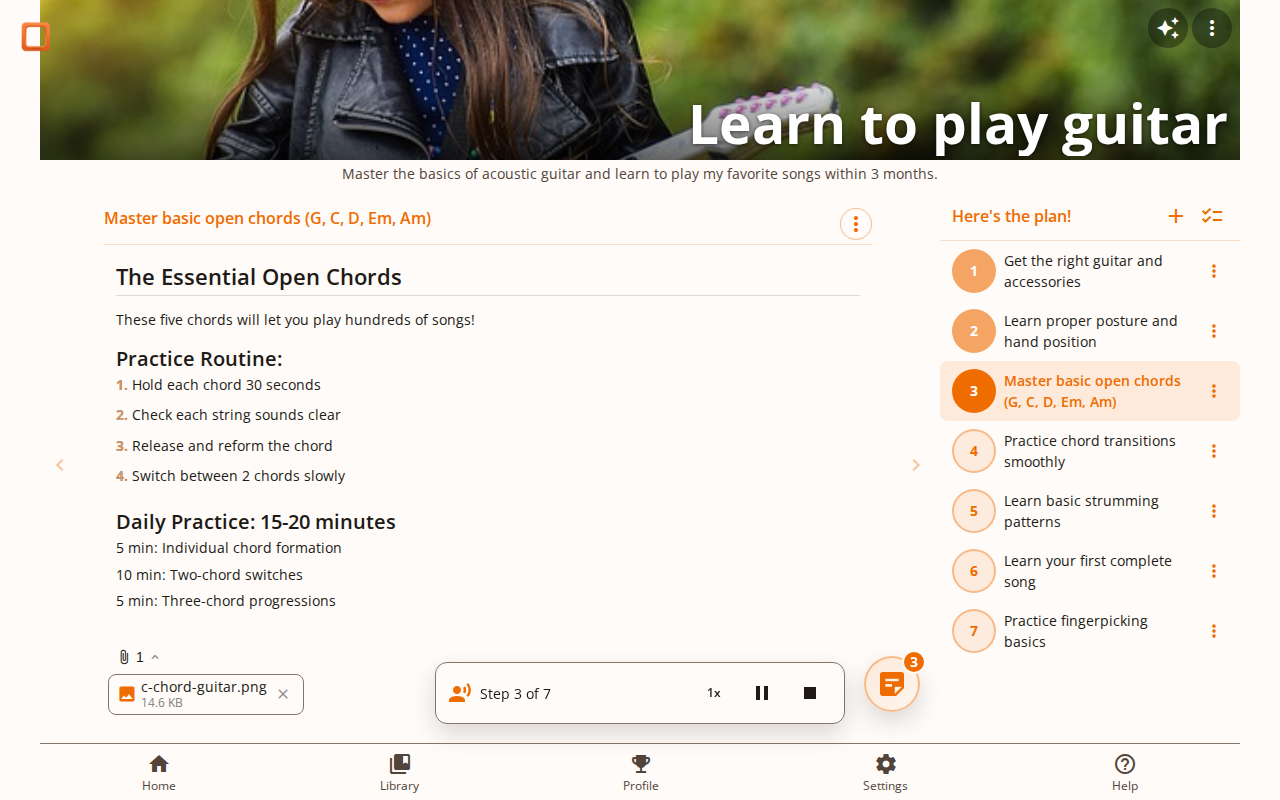
Have your step instructions read aloud using text-to-speech. This is especially useful when you need to follow instructions hands-free, such as while cooking, building, or working on a physical project.
- Open the task menu for the step you want to hear
- Select "Read Aloud" to start reading from that step
- A floating control bar appears at the bottom of the screen
- Use the pause/resume and stop buttons to control playback
- Tap the speed button to cycle through speeds (0.5x to 2x)
When a step's instructions finish, the app automatically advances to the next step and continues reading. Steps without instructions are skipped automatically. You can also stop the reading at any time by clicking the stop button or by manually navigating to a different step.
The reading voice matches your current language setting (English, French, or Japanese). By default, the app uses your browser's built-in voices. Premium users can switch to high-quality Google Neural voices in Settings > Reading, where you can also choose a specific voice from the available options.
Pro Tip
Combine generated instructions with your own notes. Generate the base content, then add your personal context, links, or specific details in the editor.
Notes
Notes let you capture thoughts, discoveries, and reminders as you work on your project. Unlike instructions (which guide how to do something), notes are your personal annotations. You can attach notes to individual steps or to the project as a whole.
Step Notes vs. Project Notes
todiia supports two types of notes:
- Step notes - Attached to a specific step. Great for capturing details, resources, or ideas related to that particular task.
- Project notes - Attached to the project as a whole. Perfect for general thoughts, overall planning, or information that doesn't belong to any single step.
When creating a note, use the scope toggle to switch between step and project scope. The toggle appears as icons at the top of the note creator.
Accessing Project Notes
There are two ways to create or view project notes:
- From the note creator - Click the notes button on any step, then switch the scope toggle to the project icon
- From the project header - Open the settings menu in the project header and select "Project Notes" to go directly to project-level notes
Adding a Step Note
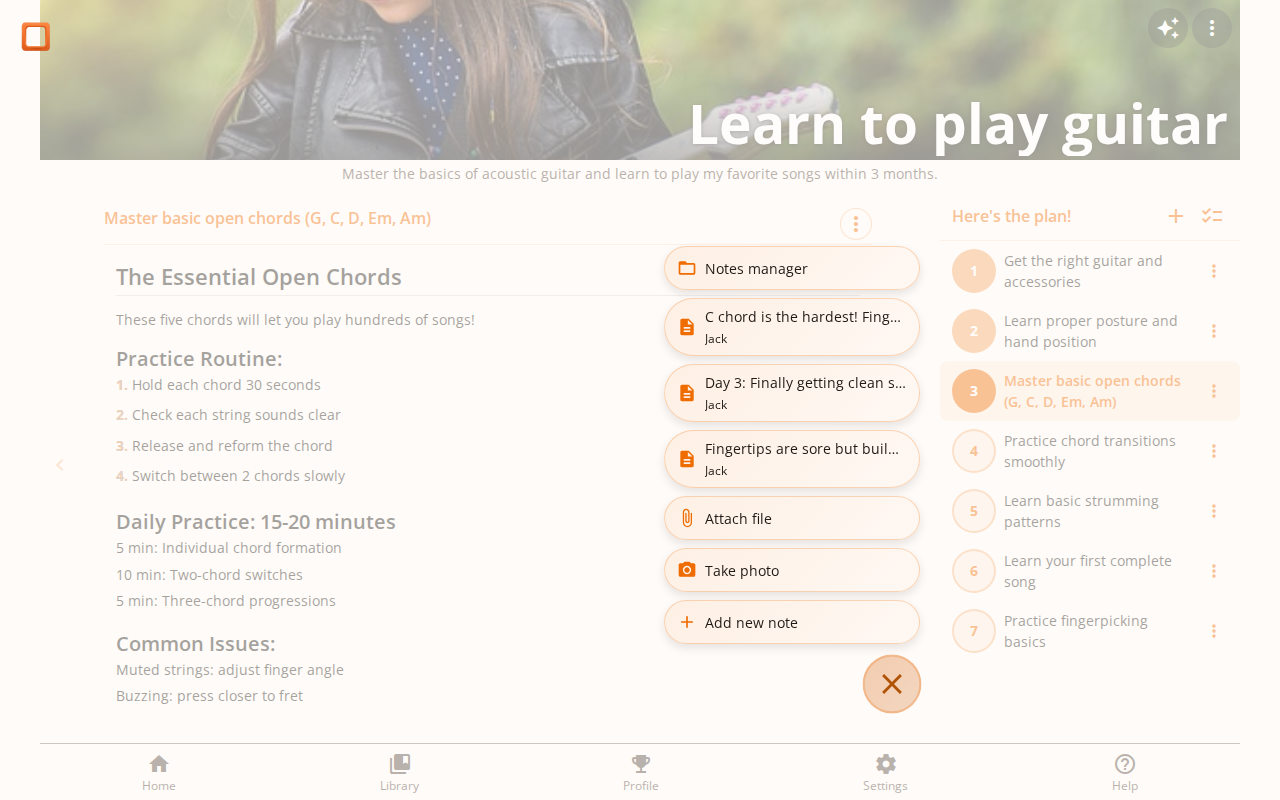
- Click the notes button (speech bubble icon) while viewing a step
- The QuickCreate panel opens with a text area
- Type your note and click "Save"
- The panel switches to show your saved notes
AI-Powered Note Generation
Use AI to help transform or generate content in your notes:
- Open the notes panel on any step
- Optionally type some initial content in the editor
- Click the "Generate with AI" button (magic wand icon)
- The AI processes your content and generates a result
The AI uses any existing text in the note editor as context. This is useful for transformations like translating text, summarizing content, or expanding on ideas.
Translation
Paste text in French, then ask AI to "translate to English" - great for working with foreign language resources.
Summarization
Paste a long article or notes, then ask AI to "summarize the key points" for a concise reference.
Viewing Your Notes
Notes have three viewing modes you can navigate between:
- QuickCreate - Fast note entry (click notes button)
- MiniManager - Preview cards of your notes
- FullManager - Complete list with edit and delete options
Use the menu button in each mode to expand to the next view level, or the collapse button to go back.
Fullscreen Editing
For longer notes or when you need more space to think, use fullscreen mode:
- In FullManager mode, click the expand button to open fullscreen editing
- The fullscreen editor provides a distraction-free writing environment
- You can also generate AI notes directly in fullscreen mode
- Click the collapse button or press Escape to return to the normal view
Editing and Deleting Notes
In FullManager mode, each note has edit and delete buttons:
- Edit - Opens the note for modification, then click "Update" to save
- Delete - Shows a confirmation before removing the note permanently
Use Notes For
Ideas that come up while working, links to resources you found, problems you encountered and how you solved them, or reminders for when you return to this step later.
Pro Tip
Combine AI generation with your own edits. Use AI to translate or transform content, then refine the result to fit your needs perfectly.
File Attachments
Attach files directly to your steps, notes, or project to keep all relevant resources in one place. Images, PDFs, videos, spreadsheets — any file type is supported.
Attaching Files to a Step
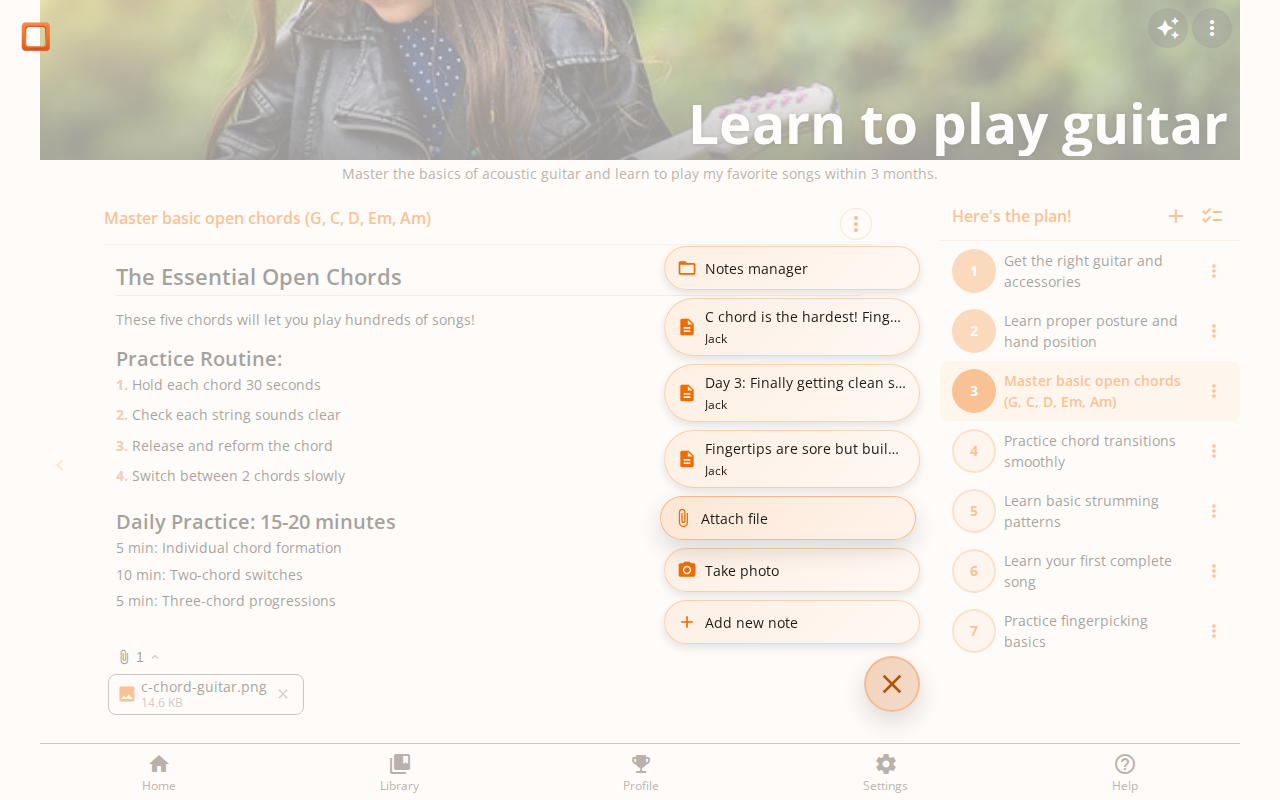
While viewing a step, use the floating action button (FAB) at the bottom of the screen:
- Tap the + button at the bottom right of the step view
- Select Attach file from the menu
- Choose a file from your device
- The file is uploaded and appears as a chip below the step instructions
Attaching Files to a Note
You can attach files while writing or editing a note:
- Open the notes panel and create or edit a note
- Click the paperclip icon in the note toolbar
- Choose a file from your device
- The file is attached and shown as a chip on the note card
Attaching Files to a Project
Project-level attachments are managed from the project information panel:
- Open the settings menu in the project header
- Select Project Files
- Click the upload button and choose your file
- The file appears in the project files list
Viewing Attachments
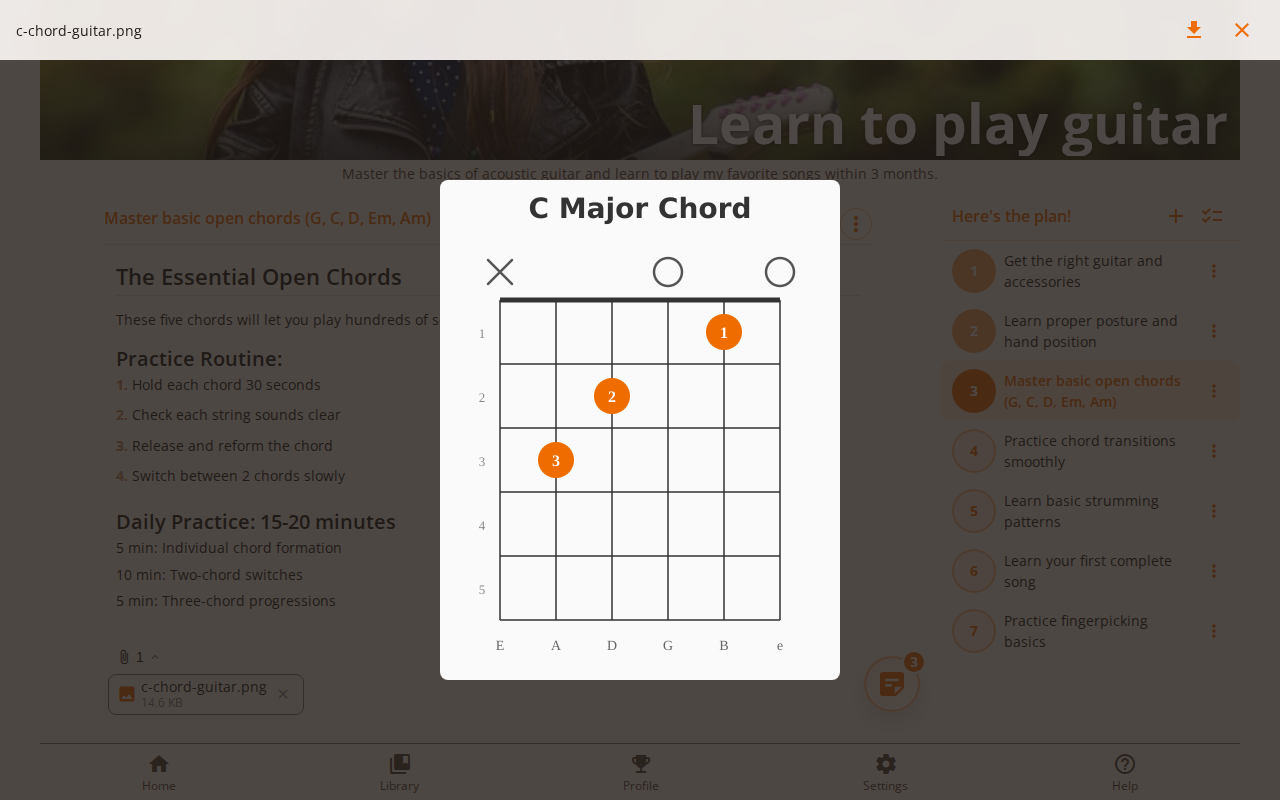
Click on any attachment chip to open the built-in file viewer:
Images
Displayed inline with fit-to-screen sizing. Swipe or use arrow buttons to browse multiple images.
Videos
Play directly in the viewer with full playback controls — no need to download first.
PDFs
Rendered in an embedded PDF viewer so you can read documents without leaving the app.
Other Files
A file card shows the name and size, with a download button to save the file to your device.
Navigating Multiple Attachments
When a step, note, or project has more than one attachment, the viewer shows navigation controls:
- Arrow buttons — Click the left/right arrows on screen to move between files
- Keyboard — Use the ← and → arrow keys on desktop
- Swipe — Swipe left or right on touch devices
- Position indicator — Shows your current position (e.g., "2 / 5")
Downloading and Deleting Attachments
- Download — Click the download icon in the viewer header to save the current file
- Delete — On the attachment chip, click the × button to remove the attachment permanently
Taking Photos Directly
Instead of uploading an existing image, you can take a photo right from your device camera:
- From the FAB menu — Tap Take photo (camera icon) to open your device camera and attach the photo to the current step
- From the note toolbar — While creating a note, tap the camera icon next to the paperclip to stage a photo for the note
- From project files — In the project information panel, tap the camera icon next to the attach button to add a photo to project files
Photos are automatically compressed before uploading, so even high-resolution camera images won't use excessive storage or bandwidth.
Pro Tip
Attach a photo of your workspace or materials at the start of a step. When you return later, you'll instantly remember where you left off — no need to reread all your notes.
Tracking Your Progress
todiia helps you visualize your daily progress and stay motivated with powerful tracking features on your project dashboard.
Day Streak
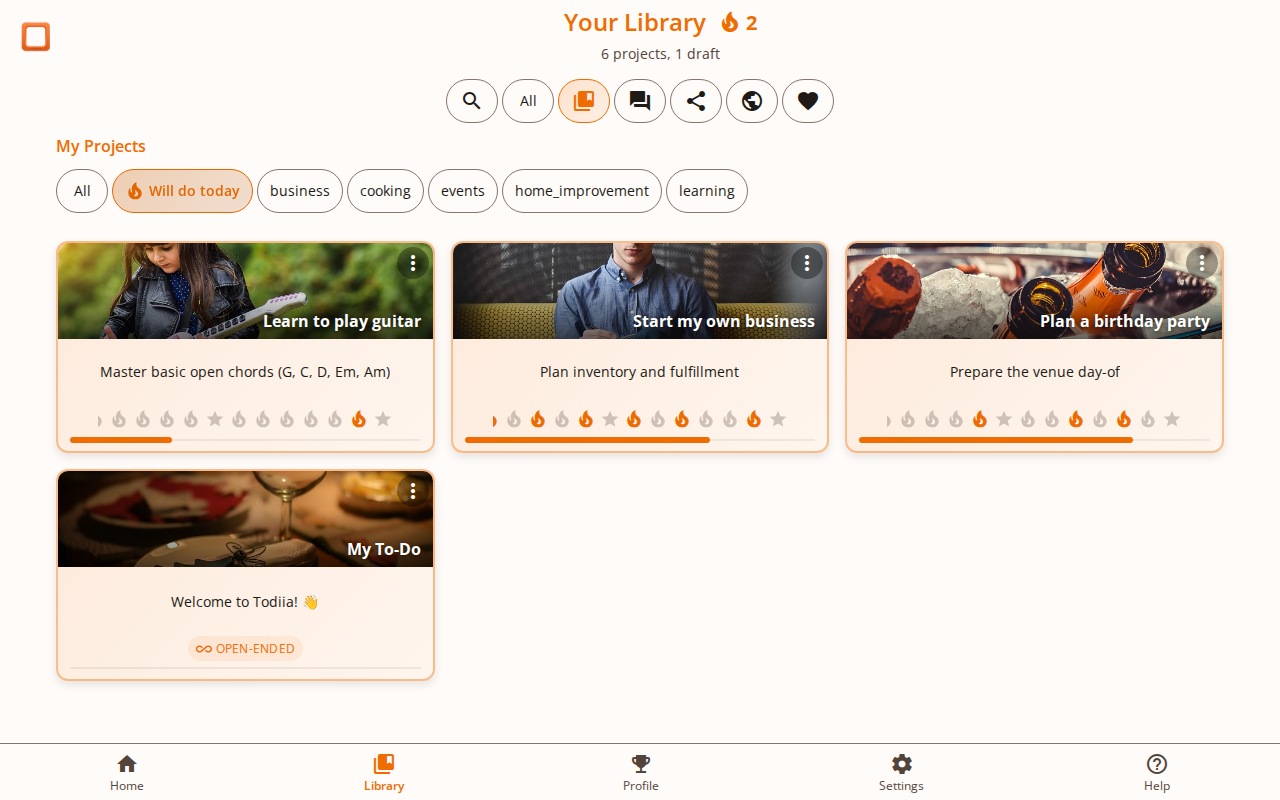
Each project card displays a day streak - a visual timeline showing your daily completion progress:
- Fire icons - Days when you completed at least one step
- Grey icons - Days when no steps were completed
- Blue stars - Mark Sundays to help you visualize weekly cycles
- Trophy icon - Appears when you complete the entire project
The streak scrolls horizontally to show your full history. On desktop, hover over the streak to reveal navigation arrows for easy scrolling. On mobile, simply swipe left or right.
Current Step Preview
Each project card shows your next step directly below the project title. This lets you see at a glance what needs to be done without opening the project - perfect for quick daily planning.
"Will Do Today" Filter
Use the fire icon filter in the filter bar to see only projects that need work today. This smart filter shows projects where you haven't completed any steps yet today, helping you maintain daily momentum and focus on what's pending.
Pro Tip
Use the "Will Do Today" filter at the start of each day to quickly identify which projects need your attention, then work through them one by one.
Daily Reports
Stay on track with optional daily email reports that keep you informed about your projects. todiia offers two reports you can enable independently.
Morning Report
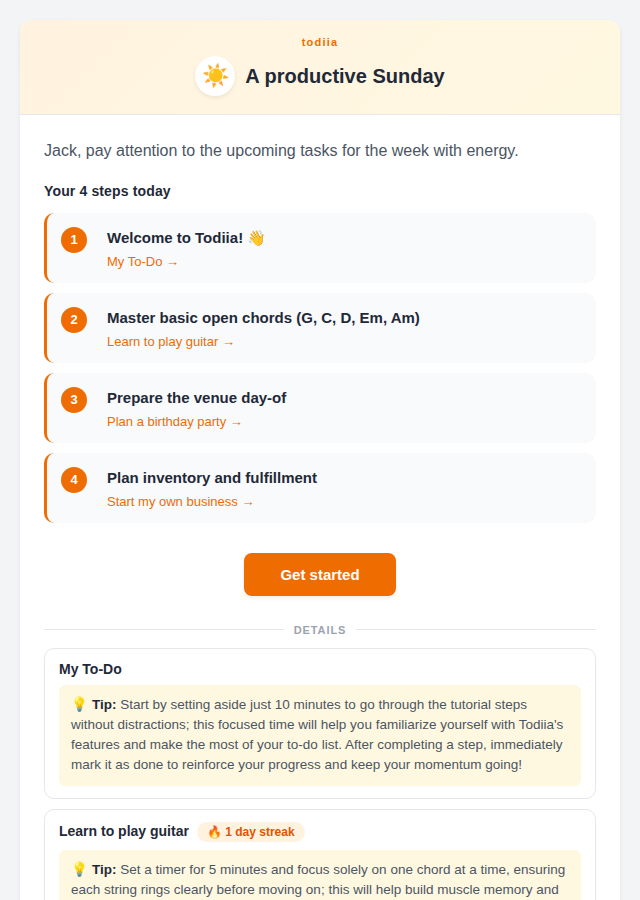
Start your day with a clear plan. The morning report shows your next step for each active project, along with a smart tip to help you get started. It also includes your current streak so you can see your momentum at a glance.
Evening Report
End your day with a summary of what you accomplished. The evening report lists all the steps you completed today across your projects, giving you a satisfying overview of your progress.
Setting Up Reports
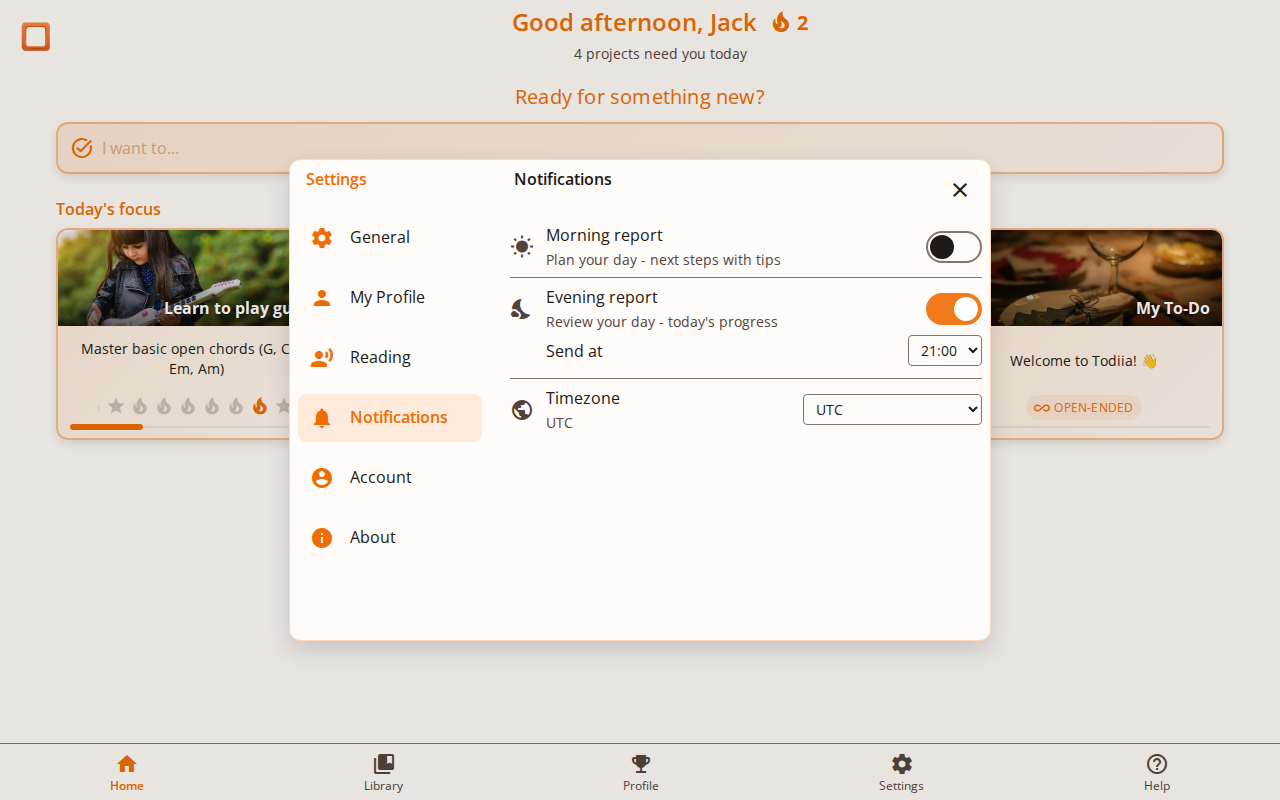
To enable daily reports, go to Settings > Notifications:
- Toggle each report on or off independently
- Choose a delivery time for each report (30-minute intervals)
- Set your timezone to ensure reports arrive at the right time
Both reports are off by default - enable them when you're ready.
Excluding Projects
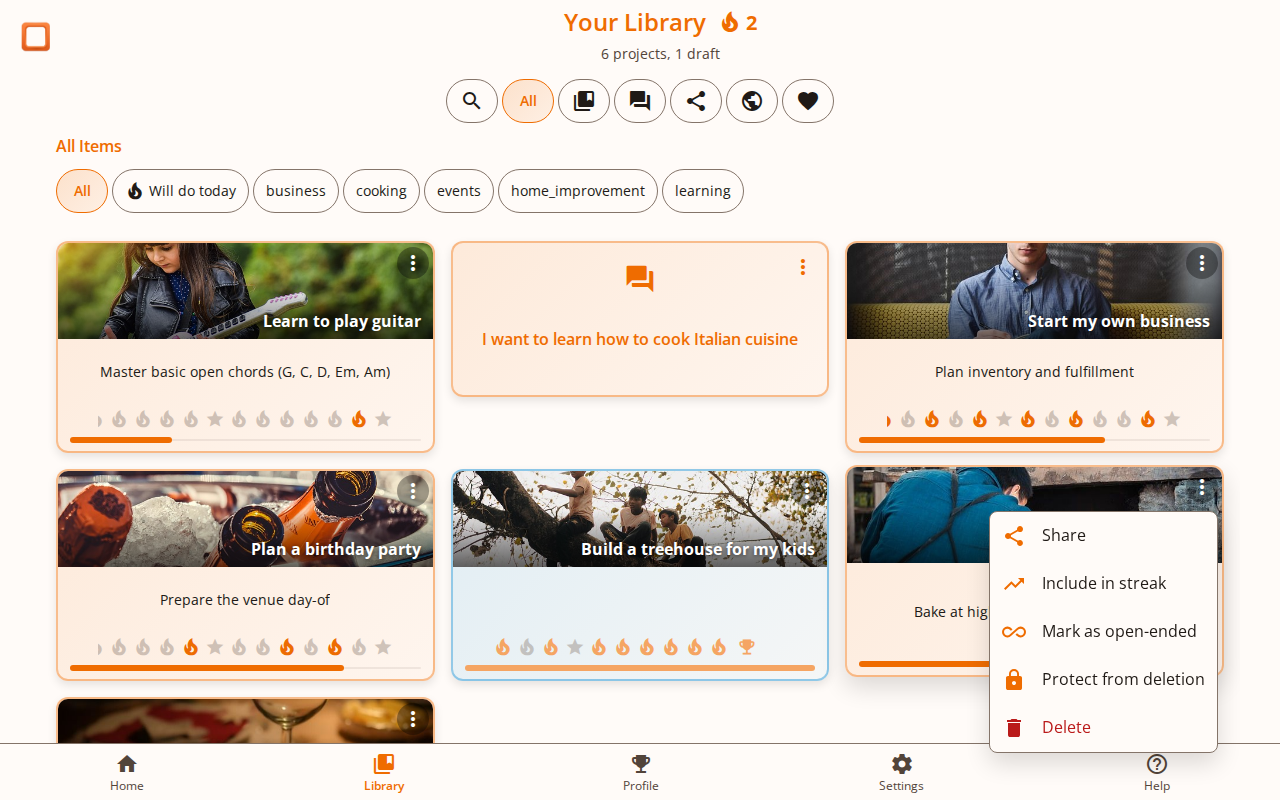
If you have projects that you don't want included in your daily reports or streak tracking, you can exclude them. In your Library, open the project card menu (three dots) and select Exclude from streak. Excluded projects won't appear in your daily reports and their streak will be hidden from the dashboard.
Pro Tip
Set your morning report to arrive just before you start your day. The smart tips give you a concrete first action for each project, making it easier to dive right in.
Personalization
todiia can tailor its suggestions, instructions, and project plans to your personal situation. By sharing a bit about yourself, every generated content becomes more relevant to you.
Setting Up Your Profile
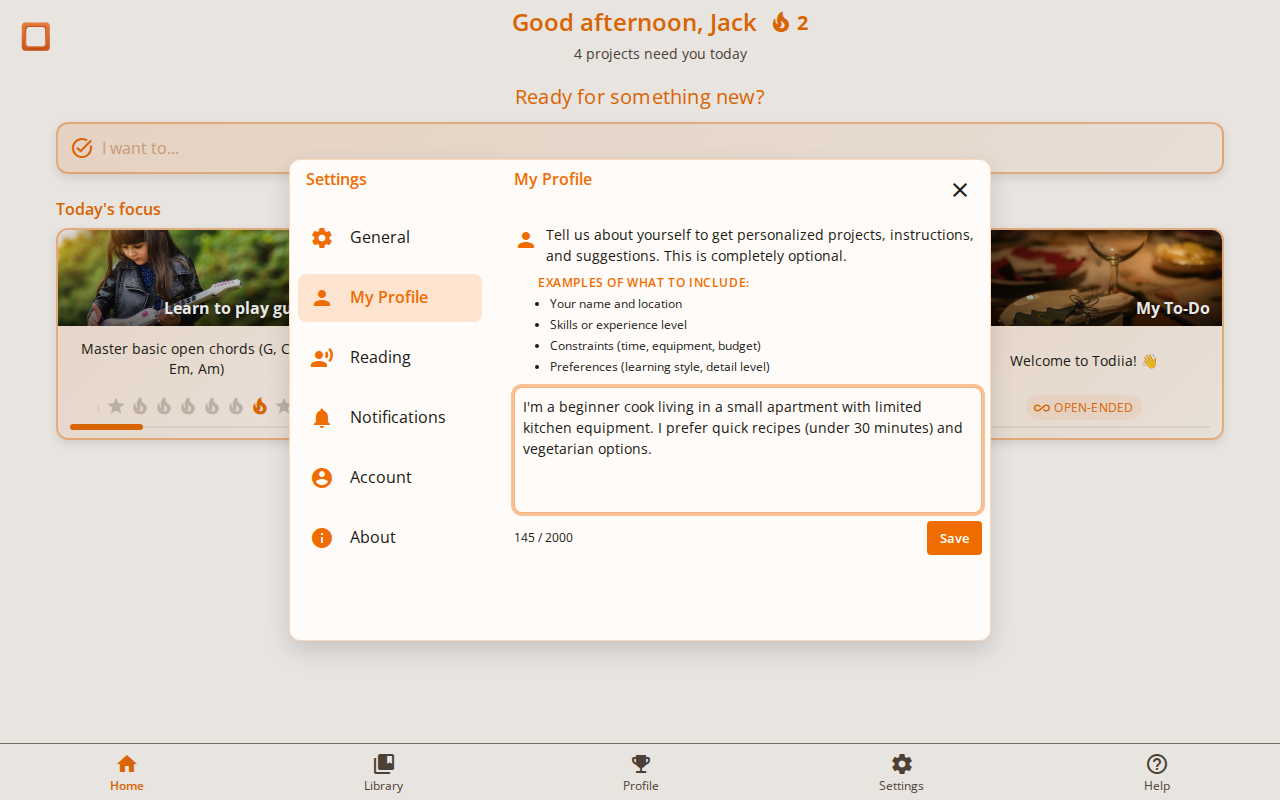
Open Settings and select My Profile. You will see a free-form text area where you can describe anything that helps the app understand your context. This is completely optional.
What to Include
- Your name and location — for a more personal tone
- Skills or experience level — so instructions match your ability
- Constraints — time, budget, equipment, or physical limitations
- Preferences — learning style, level of detail, favourite approaches
How It Works
Once saved, your profile is automatically included in every request that generates content: project plans, step instructions, coach conversations, note suggestions, recaps, and daily report tips. You do not need to repeat your preferences each time — the app remembers.
Pro Tip
Be specific. Instead of “I like cooking”, try “I am a beginner cook with a small kitchen — I prefer recipes under 30 minutes using basic equipment.” The more detail you give, the more relevant the suggestions become.
Your Profile
The Profile page is your personal dashboard. It brings together your stats, achievements, and activity history in one place so you can see how far you've come.
Stats Overview
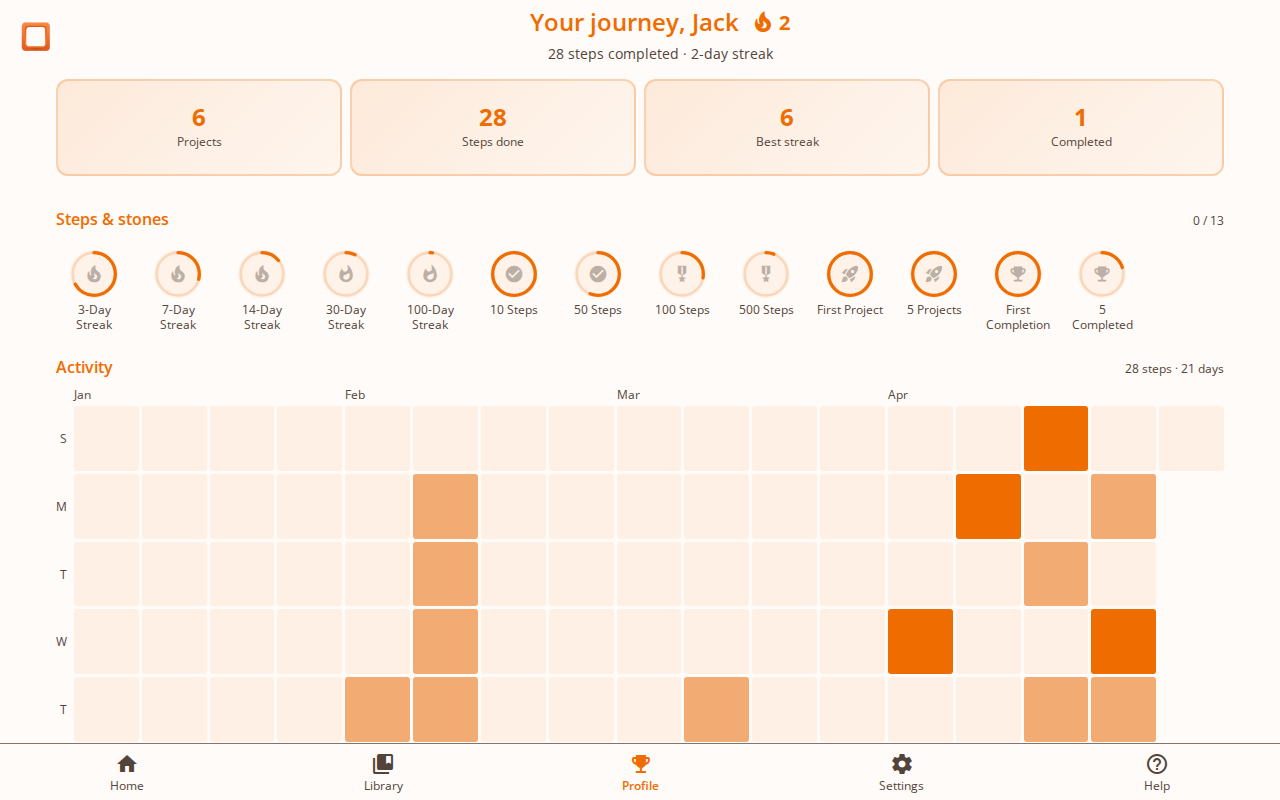
At the top of your profile you'll find four key metrics:
- Projects — Total number of projects you've created
- Steps done — Total steps you've completed across all projects
- Best streak — Your longest run of consecutive active days
- Completed — Number of projects you've finished entirely
Personal Journal
Below the stats, a short automatically generated summary reflects on your recent activity and highlights what you've accomplished. Tap the refresh button to generate a new summary whenever you want an updated reflection.
Badges & Milestones
Earn badges as you hit milestones. Badges are grouped into three categories:
- Streaks — Awarded for maintaining consecutive active days (3, 7, 14, 30, and 100 days)
- Steps — Awarded for completing steps (10, 50, 100, and 500 steps)
- Projects — Awarded for creating and completing projects
Locked badges show a progress ring so you can see how close you are to earning them. Tap any badge to see its description and your current progress or the date you earned it.
Activity Heatmap
At the bottom of the profile, a heatmap displays your step completions over the last several months. Each cell represents a day, with darker shades indicating more activity. Hover over (or tap) a cell to see the exact date and step count. A summary shows your total steps and the number of active days.
Pro Tip
Check your profile regularly to stay motivated. Watching your streak grow and badges unlock is a great way to keep up your momentum.
Sharing Projects
Share your projects as templates that others can discover, customize, and use. This is great for sharing successful planning strategies with friends, colleagues, or the community.
Publishing a Project as a Template
- Open the project card menu and click "Share"
- Enter a title (pre-filled from your project name) and description
- Optionally click the magic wand to auto-generate a description
- Click "Publish" to create your public template
Once published, you'll get a shareable link you can copy or share directly via messaging apps. Your project card will show a share badge to indicate it's been shared.
Using Shared Templates
When you receive a template link from someone, you can:
- Preview - See the template's title, description, and all steps before cloning
- Like - Click the heart icon to save templates you find useful
- Clone - Click "Follow This Plan" to add the template to your projects
- Customize - Use AI to personalize the template before cloning
Customizing Templates
Before cloning a template, you can customize it to better fit your situation:
- On the template page, scroll to "Customize this plan"
- Choose a suggested customization or write your own
- Click "Create My Version" to clone with your customizations applied
For example, you might adapt a fitness template for home workouts, or modify a cooking template for vegetarian ingredients.
Pro Tip
When sharing templates, write clear descriptions that explain who the template is for and what makes it useful. Good descriptions help others decide if it's right for them.
Exporting Content
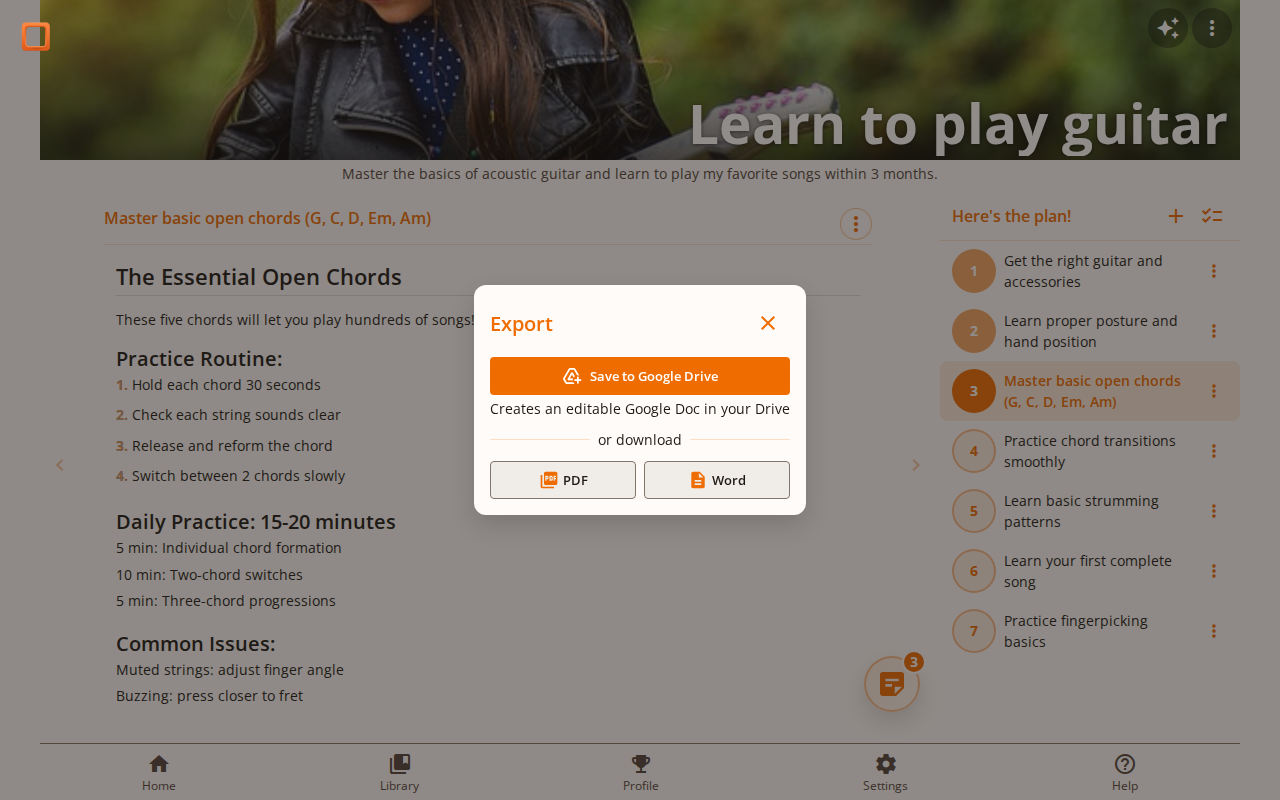
Export your step instructions and notes to use them outside the app. Whether you need a printable version, a document to share, or a backup in your cloud storage, todiia makes it easy.
Export Formats
Download a formatted PDF file, perfect for printing or sharing as a read-only document.
Word (DOCX)
Download a Word document that you can edit further in any word processor.
Google Drive
Save directly to your Google Drive as an editable Google Doc. Requires connecting your Google account.
Exporting Step Instructions
- Open the task menu for the step you want to export
- Select "Export Instructions"
- Choose your preferred format (PDF, Word, or Google Drive)
- The file downloads automatically or saves to your Drive
Exporting Notes
- Open the notes panel and find the note you want to export
- Click the export option on the note card
- Choose your preferred format
- The file downloads or saves to your Drive
Google Drive Integration
To save content directly to Google Drive:
- Select "Google Drive" as the export format
- If not connected yet, you'll be prompted to sign in with your Google account
- Once connected, the document is created as a Google Doc in your Drive
- A success dialog appears with a link to open the document directly
Pro Tip
Export your instructions before starting a task that takes you away from your computer. Having a PDF on your phone means you can follow the steps anywhere.
Tips & Tricks
Get more out of todiia with these productivity tips:
Be Specific with Goals
When starting a project, describe your goal clearly. Include context like deadlines, constraints, or preferences for better results.
Answer Thoughtfully
The clarification questions shape your project. Take time to answer accurately - it results in more relevant and useful steps.
Use Notes Liberally
Capture ideas, links, and discoveries in step notes. Your future self will thank you when returning to a step later.
One Step at a Time
Focus on the current step. todiia's interface keeps you focused on what matters right now instead of the whole project.
Split When Overwhelmed
If a step feels too big, split it. Keep breaking steps down until each one feels like something you can start right now.
Mark Progress Often
Complete steps as you finish them. Seeing the progress dots fill in is satisfying and helps track your accomplishments.
Need More Help?
If you have questions or need assistance, feel free to reach out:
- Email us at vanginjac@gmail.com